Welcome back to the second part of this tutorial. We’ll continue right were we left. In this second part, we’ll install Ubuntu and do some last tweaks to our installation.
At the end of this post, you should have a working virtual operating
system.
Note : I’ll do a third (and final) part to help your learn and configure Ubuntu.
Installation
Installing Ubuntu is very easy. It’s probably the easiest installation of all Unix systems. Everything is done using a graphical interface, were you just have to answer some questions and hit “continue” (yes, that’s very Windows-like).
To start with, select your image in Virtual box, and click start (or double-click on the image). This will ask for the start-up disk. Just click on the yellow folder (with a green arrow), and browse to the downloaded .iso file.
Then, click
Start.
The install software will start loading by itself…
… until you see what looks like a basic desktop. Don’t worry too much if the resolution is small, you should be able to resize the window. You are presented with two options.
- Try Ubuntu : This will run a live version of Ubuntu, but any changes you do will be lost on reboot. It can be used to test Ubuntu on your computer without installing anything (Note : it can also be used to restore or recover files from an OS that won’t boot.. as long as your computer is running properly)
- Install Ubuntu This is the option we will use

Check both options to allow Ubuntu to install updates and some third-party softwares to handle proprietary formats (such as MP3 files, etc), then click on Continue.
Choose the first option to use the whole disk (remember, it’s a virtual file on your disk, so you can’t destroy your files outside the virtual machine), and click Install Now.
A popup will show you that two partitions will be created. One big partition using the ext4 filesystem, and one smaller Swap partition (it may be useless now that all computers have plenty of RAM, but older computers could still need this when the amount of physical RAM is full).
Click
on Continue.
Next steps is easy, just select your timezone, and click on Continue.
Choose your keyboard layout, and hit Continue.
Now, you’ll have to choose a login and password. Ubuntu supports multiple accounts like most operating systems. Once it’s done, click Continue.
This time, the real installation will start, and the files will be copied onto the virtual disk. You can read what’s on screen to learn a bit more about Ubuntu, or just grab a cup of coffee until the process is finished.
Once the installation is complete, you’ll have to restart the virtual machine (not your computer).
Ubuntu will ask you to hit ENTER and then remove the installation disk. Fortunately, VirtualBox will do that for you, and turn off the fake CD drive that was reading the ISO file.
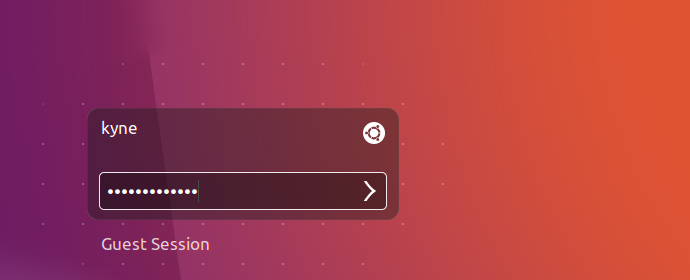
Once restarted, you should see the Ubuntu login screen. If you properly setup the keyboard, you should have no problem to selected your account and type your password. Note hat the “Guest Session” is similar to the “Try Ubuntu” option we
saw before. Everything will be cleared out at the end of the session.
Ok, some final tweaks before using our brand new system. First, we’ll install the Guest Additions by going into the VirtualBox menu, and clicking on “Insert Guest Additions CD image…”. This will allow some features between your
computer and the virtual machine, such as a shared clipboard, etc.
This will once again emulates a CD drive that will be automatically discovered by Ubuntu. Just click on Run when this popup shows.
A terminal will start and display some logs. Just wait for the “Press Return to close this window” to show. Hit Enter and the terminal will close.
Now, go to the VirtualBox menu, click Devices and enable the bidirectional clipboard. Then, restart Ubuntu by going to the top right icon (the “power icon that looks like a gear”) and shutdown the system.
Now, reboot your operating system. And Voila, you have a fully operational operating system that can be used to work on your home development projects.
Conclusion
Using Ubuntu is not hard, but you will probably struggle a bit at the beginning. That’s why I will write a full third part to this guide to help you discover your new desktop.
But here are some hints to help you wait the next post :
- If you press the “Windows” key (I think it’s the “Command” key on Mac…), a global search will be triggered. Yo can search for applications, files or configurations menu. You can also just click on the top left icon in the Unity menu. (the left bar with all the big icons)
- Firefox : Firefox is installed by default, and is a very functional web browser. On Ubuntu, it seems to work a bit better than Chromium (it’s the open-source web browser project from which Google Chrome draws its source code). So you can start browsing the Internet as usual
- Terminal : This is where you can type your commands. It’s actually very powerful, and can make you save a lot of time. We’ll use it later on to install more stuff.
- Files : The file explorer should also be available on the left, but you won’t have access to your Windows files for now. This will be covered in the next post.
- System configuration : This is similar to Windows “Control Panel”. Most of the configuration can be done there, from changing the wallpaper to switching to another keyboard layout.
- Ubuntu-software : This application can help you install new software, simply by searching for them by names. This is one major changes from Windows : in most Unix systems (if not all…), applications are hosted on repositories,
and you can install them without having to look them up on the Internet. Some repositories have to be added manually (or enabled), and some applications are still distributed as
.debfiles (Debian packages), but they can be installed simply by double-clicking on them.
Finally, you can switch to fullscreen mode in VirtualBox by hitting HOST-KEY + F. “HOST-KEY” is “Right CTRL” on Windows. Simply press the same keys to go back to windowed mode.