You may already know that Nintendo recently released the Nintendo Classic Mini, a smaller re-edition of the original NES, but with a limited set of pre-installed games.
The Nintendo Classic Mini: Nintendo Entertainment System is a miniaturised version of the groundbreaking NES, originally released in Europe in 1986.
Just plug the Nintendo Classic Mini: Nintendo Entertainment System into your TV, pick up that grey controller, and rediscover the joy of NES games – in high definition at 60 Hz!
Now, what if I told you that there are other reliable, (cheaper?), easy to setup, alternatives? Yes, that’s right, and it’s called the Raspberry Pi. But instead
of letting you play some NES games, this will actually allow you to play any NES, Super NES, Gameboy, GBA, NeoGeo, .. and even Playstation games. And this will only cost you around 70$ (unfortunately,
it will also cost 70€ if you are from Europe like me, so it’s a bit more expensive).
You will even be able to use the Raspberry Pi as a media center, if you are tired of playing games.
As you have probably seen, this tutorial will also be split into multiple parts. The first one will teach you a bit more about the raspberry and how you can set it up. The second part will teach you how to install the proper softwares to
dive into the retro-gaming madness.
Introduction
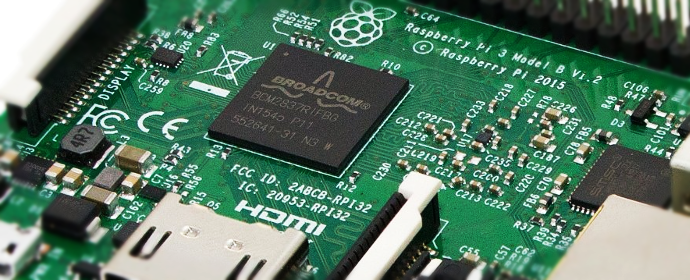
So, before starting any further, I want to assure you that you don’t need any special knowledge for this tutorial. While it may look a bit scary, the Raspberry Pi is just a small computer. It actually looks like this (with no case)
:

For this tutorial, I will recommend the last edition of the Raspberry Pi, called the Pi 3 Model B.
Here are the specifications :
- A 1.2GHz 64-bit quad-core ARMv8 CPU
- 802.11n Wireless LAN
- Bluetooth 4.1
- 1GB RAM
- 4 USB ports
- Full HDMI port
- Ethernet port
- Combined 3.5mm audio jack and composite video
- Micro SD card slot
If you own a Raspberry Pi 2 Model B, this tutorial still works but the Model 3 has built-in WiFi, and is a bit more powerful.
What do I need?
Of course, you’ll need a Raspberry Pi. But you’ll also need some other stuff :
- An HDMI cable to connect your Raspberry Pi to your TV
- A power plug, because it doesn’t run on awesomeness alone
- A Micro SD Card (8Gb or more)
- An USB Gamepad (wireless gamepads may not work)
- (optional) a Raspberry Pi case
- (optional) An USB Keyboard (just once, to setup the WiFi)
- (optional) An USB mouse (the gamepad should be enough in all situations)
- (optional) An ethernet cable (if you don’t have WiFi, or don’t want to use it)
Here is a schema that will show you how the Raspberry will be connected
Where can I get this?
You can buy these one by one, or just buy a pack from Amazon. This will ensure you buy the proper power plug and case format.
- Amazon.fr : https://www.amazon.fr/Vilros-Raspberry-Pi-Complete-Starter/dp/B01DC6MKAQ/ref=sr_1_2?ie=UTF8&qid=1481889791&sr=8-2&keywords=raspberry+pi+3
- Amazon.uk : https://www.amazon.co.uk/Vilros-Raspberry-Pi-Complete-Starter/dp/B01D0BKLZY/ref=sr_1_7?ie=UTF8&qid=1481889825&sr=8-7&keywords=raspberry+pi+3
- Amazon.com : https://www.amazon.com/Vilros-Raspberry-Media-Center-Kit/dp/B01CYX4HRM/ref=sr_1_1?s=pc&ie=UTF8&qid=1481889863&sr=1-1-spons&keywords=raspberry+pi&psc=1
There are a lot of other packs and websites, but these few should help you find exactly what you need.
But.. I need to build it?
Not really. Installing the Raspberry Pi only requires you to plug the cables. I recommend to use a case (the transparent one from the pack for example) to protect the components (even from dust). Some packs will pack a pre-installed Micro SD Card, but we will format it anyway in the next part. So feel free to use it for now, or wait a bit more.
- The first step is to put the Raspberry into the case. I also recommend to screw it to the lower part.
- Then, if you have some, you can put the small heatsinks on the top chips. It won’t do much, but it was probably in the pack, so why not. (You don’t need thermal paste)
- Close the case, and put the SD card in the bottom slot (depending on the case you may want to do it before for easier access)
- Plug the HDMI Cable to your TV or monitor (If you are not using HDMI, you can also plug in your analogue TV or display, but you’ll need to use the audio jack for sound)
- Plug you USB Gamepad to any of the USB slots
- Plug the power supply. The Raspberry Pi will starts automatically (there are no ON/OFF buttons, so you’ll need to unplug it to shut it down. You can also use some kind of multi sockets with an ON/OFF button on it)
- If needed, plug an USB keyboard into any of the available USB slots.
- If you don’t want to (or simply can’t) use WiFi, plug the ethernet cable to your router (probably next to where your computer is plugged). If this is too far, you can buy a gigabit switch and one more ethernet cable (I had to do the same, not for the Raspberry, but for my Android TV, because my computer is at one end of a room, my TV on the opposite side, and the router is simply on another floor).
Simply plug the switch to the power supply, and run a cable from your modem/router to your switch. Then, plug two cables, one from the switch to your computer, and the second cable from the switch to your Raspberry pi. Use straight “cat6” cables (well, it seems that modern switches and router can use both straight and crossover cable), or “cat5” for longer cables. You can find them on Amazon.com (RJ45), simply pick the proper cable length. (Amazon “basics” cables should be available on every other Amazon websites).
What’s next?
Next, I will show you how to install RecalBox onto your SD Card, and configure it to play some good old games.
Here are some screenshots from Recalbox :


Don’t worry, the installation is fully automated. The only steps you’ll have to do yourself are
- copying Recalbox on the SD Card (you will need a card reader, but you’ll only need it once, so you should be able to borrow one)
- configuring your gamepad(s)
We will cover all the details in the next post.